Transcript
1. Overview
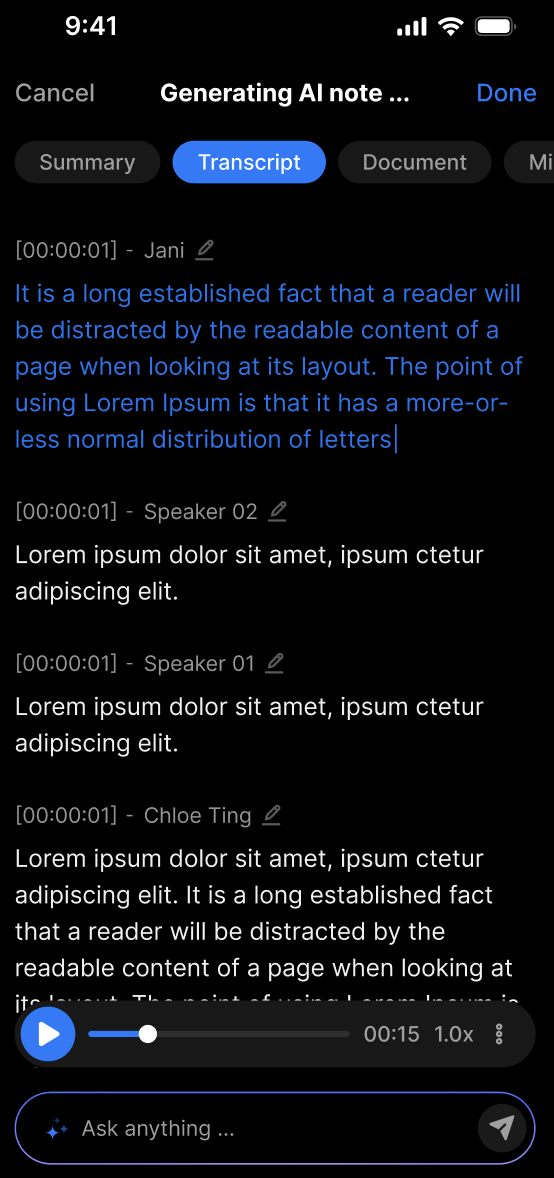
The Transcript feature allows you to view the full text generated from audio, video, weblinks, YouTube, documents, or images.
It serves as the foundation for creating summaries and helps you easily search, reference, and quote content.
![]()
Overview Transcript Screen
2. Transcript Sources
| Input Source | Transcript Is Generated Via |
|---|---|
| Live Recording | Through the Record feature |
| Uploaded Audio File | Through the Upload Audio feature |
| Manual Note | Typed directly by the user |
| Documents (pdf, doc, txt, md) | Via Upload Document feature |
| Weblinks (YouTube, TikTok, etc.) | Via Upload Weblink feature |
📌 All content must be processed by AI before the transcript is available — you’ll see the transcript once processing is complete.
3. How to Use
Step 1: Access the note detail
Step 2: Switch to the Transcript tab
Transcript is displayed by timestamp or speaker segment:
- Shows timestamps like
00:00:01,00:00:15, etc. - Speaker names or roles (if available), like “Speaker A”, “Speaker B”, or custom names
4. Notes
- Transcripts may not be 100% accurate if the audio is of poor quality or contains background noise.
- If you find recognition errors, please correct them manually to improve the accuracy of related features.
✍️ Edit Transcript – User Guide
1. Overview
The Edit Transcript feature allows you to directly modify the transcript content generated from audio or video.
This is ideal for correcting voice recognition errors, adding/removing details, or improving readability before sharing or summarizing.
![]()
Edit Transcript
2. Key Benefits
✅ Easily correct misrecognized speech
✅ Improve transcript clarity and accuracy
✅ Personalize the transcript to fit your context
✅ Quickly update without re-uploading or editing the original audio
3. How to Use
Step 1: Open the note detail and go to the Transcript tab
Step 2: Click on the section of transcript you want to edit
- An edit icon will appear at the bottom of each block
- Click to enter editing mode
Step 3: Edit the content as needed
- You can use basic formatting (if supported), such as bold, italic, or numbered lists
Step 4: Click Save to confirm your edits
- The system will update the transcript with your latest version
4. After Editing
- The updated transcript will fully replace the original
- You can return and edit it again anytime
5. Notes
- Changes are not auto-saved – always click Save before exiting
- There’s no undo function – copy the original if you want to keep it
- Edits are account-specific and do not affect global system data
🗣️ Speaker Identification – User Guide
1. Overview
The Speaker Identification feature automatically detects and distinguishes between different speakers in an audio or video file.
This makes the transcript more clear, structured, and useful for meetings, interviews, podcasts, etc.
Speaker Identification
2. Key Benefits
✅ Automatically tags dialogue by speaker
✅ Makes transcripts more professional and readable
✅ Convenient for processing multi-speaker recordings
✅ Improves accuracy for summaries, slideshows, and translations
3. How to Use
👥 Steps to identify speakers:
- Upload or record an audio/video file as usual
- Once the transcript is ready, the system will run Speaker Identification
- Each segment is labeled (e.g., Speaker 1, Speaker 2, etc.)
You can rename speakers manually:
- Click the ✏️ icon next to a speaker’s name
- Enter a custom name (e.g., “Mai”, “Host”, “Client”)
- Click Save to apply
4. Tips for Best Results
🧍 Record clearly and avoid overlapping voices
🎤 Use separate microphones if possible
🏷️ Rename speakers after the transcript is complete to improve clarity
5. Notes
- Works best with 2–6 clearly distinguishable speakers
- If speaker tagging is incorrect, use Edit Transcript to fix manually
- Renaming a speaker does not affect the original audio
❓ FAQ – Transcript, Edit Transcript, and Speaker Identification
1. What types of files can generate a transcript?
Transcripts can be generated from live recordings, uploaded audio files, manual notes, documents (pdf, doc, txt, md), and weblinks like YouTube or TikTok.
2. How accurate are the transcripts?
Accuracy depends on audio quality and clarity. Background noise or overlapping speech can reduce accuracy. You can manually edit the transcript to correct errors.
3. Can I edit the transcript after it’s generated?
Yes, the Edit Transcript feature allows you to modify any part of the transcript to fix mistakes or improve clarity.
4. Will my edits affect other users or the original audio?
No, edits only apply to your personal view and do not alter the original audio or the system-wide transcript.
5. Is there an undo feature when editing the transcript?
No, there is no undo. It is recommended to copy the original transcript if you want a backup before editing.
6. How does Speaker Identification work?
The system automatically detects different speakers and tags each speech segment with a speaker label (e.g., Speaker 1). You can rename speakers manually.
7. Can I rename speakers in the transcript?
Yes, click the edit icon next to a speaker’s name to rename it. This helps personalize and clarify who is speaking.
8. How many speakers can the system identify?
Speaker Identification works best with 2 to 6 clearly distinguishable speakers.
9. What if speaker identification is incorrect?
You can manually correct speaker names using the Edit Transcript feature.
10. Does renaming speakers change the original audio?
No, renaming is only for transcript clarity and does not affect the audio file.
11. Why don’t I see a transcript immediately?
Transcript generation requires AI processing time after uploading or recording. You’ll see the transcript once processing is complete.
12. Are transcripts saved automatically after editing?
No, you must click Save after editing. Leaving without saving will discard changes.