Record
The Record feature allows users to quickly and conveniently capture voice content, which is then automatically summarized into text using AI. This feature is ideal for various use cases such as personal notes, team meetings, interviews, lectures, or important conversations that need to be processed later.
The recording process is simple, supports multiple languages, and ensures secure storage even without an internet connection.
Key Benefits:
- High-quality recording with a single tap.
- Flexible storage: recordings are saved on the device and optionally synced to NoteX Cloud.
- High security, powered by AWS-grade infrastructure.
- Automated AI processing: supports transcription and summarization (if online).
- Customizable summary and writing style via Advanced Settings.
- Simple and intuitive user experience, even for first-time users.
1. UI/UX Specification
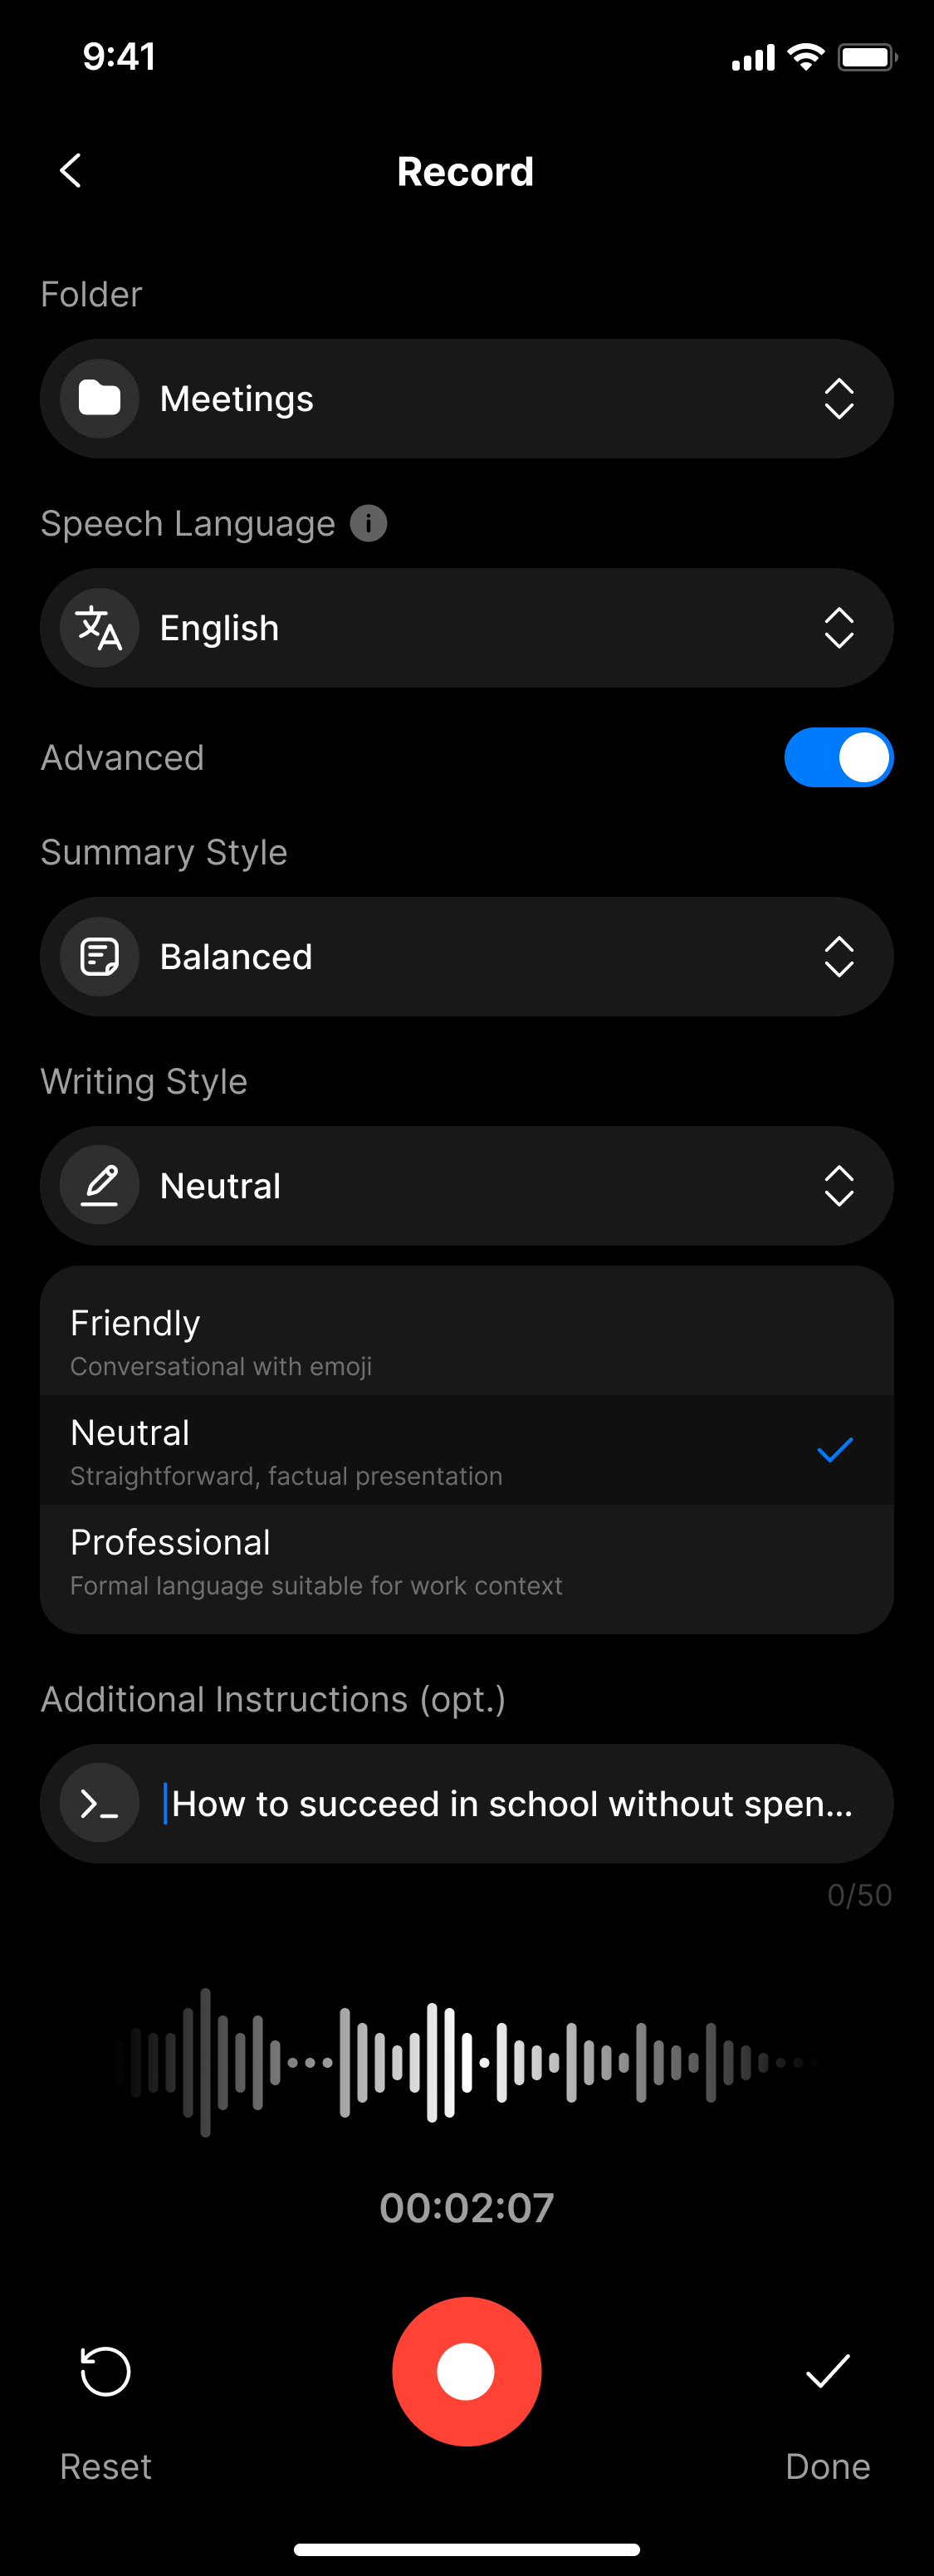
UI specification create record screen
How to access the Record screen
From the home screen, tap on the Record tab in the bottom navigation to access the recording interface.
Screen Components
| Component | Type | Description |
|---|---|---|
| Header | Header | Displays the title "Record" and a back/close button. |
| Timer | Text + Counter | Displays the duration of the current recording. |
| Audio Waveform | Visualizer | Real-time visualization of the microphone input. |
| Speech Language | Dropdown | Required: select the spoken language (e.g., English, Vietnamese). |
| Folder Selector | Dropdown | Optional: categorize the recording into a folder. |
| Record Button | Red Button | Starts the recording; becomes "Done" during recording. |
| Reset Button | Button | Discards the current recording and starts over. |
| Done Button | Button | Ends the session and saves the recording. |
| System Notice | Dialog | Reminds the user to select a language before saving. |
| Advanced Toggle | Toggle | Enables advanced AI customization options. |
| Summary Style | Dropdown | Choose the summary tone (e.g., Balanced, Factual, Creative). |
| Writing Style | Dropdown | Choose the writing tone (e.g., Neutral, Professional, Informal). |
| Additional Instructions | Text Input | (Optional) Add guidance to help the AI prioritize or emphasize content. |
2. How to Use
Step 1: Open the recording screen
From the home screen, tap on Record to launch the recording interface.
Step 2: Start recording
Tap the red Record button to begin. The screen will display the live waveform and timer.
Step 3: Select the spoken language (required)
Tap on Speech Language and choose the language you are speaking.
Selecting the correct language is required to ensure accurate transcription and processing.
Step 3.1: (Optional) Enable Advanced Settings
Scroll down and toggle Advanced if you want to customize AI output.
Step 3.2: Configure Advanced Options
- Summary Style: Choose how the summary should sound (Balanced, Factual, etc.)
- Writing Style: Choose the tone of voice (Neutral, Professional, etc.)
- Additional Instructions: (Optional) Add specific goals or directions, e.g.:
"How to succeed in school without spending much money"
Step 4: (Optional) Select a folder
Organize your file by assigning it to a folder.
Step 5: Stop and save
Tap Done to stop and save your recording. It will be saved locally on your device, and if connected to the internet, it will be synced to NoteX Cloud and summarized using AI.
(Optional) Start over
Use the Reset button to discard the current recording and begin a new session.
3. Notes & Tips
- Always select a spoken language before tapping Done to ensure the recording is processed correctly.
- Use folders to keep your recordings organized.
- Recordings are always saved locally, even if offline or if processing fails.
- If you're in a rush, simply tap Done—your audio is safe.
- Only use Reset if you're sure, as it cannot be undone.
- Use Additional Instructions to personalize the summary to your needs.
4. FAQ
What if I forget to select a language?
The system will not allow saving until a spoken language is selected.
If the upload to cloud fails, do I lose my recording?
No. The file is always saved locally first. You can retry uploading later via:
Settings > Manage Recordings
Can I record without an internet connection?
Yes. Recording and local saving work offline. However, AI features like summarization require internet access.
I accidentally tapped "Reset" — can I recover the file?
No. The reset action permanently deletes the recording and cannot be undone.
Can I pause and resume a recording?
Yes. The app supports pausing and resuming within the same session.
Where are recordings stored?
- Locally:
Settings > Manage Recordings - In the cloud: If online, your file will automatically sync to your NoteX account.
Can I change how the AI summarizes my recording?
Yes. Use Advanced Settings to define the summary style, tone, and additional instructions.
Is there a limit on recording time?
Yes. The recording time depends on your account type:
- Free users: Unlimited recording time per session, with available audio or reward credits.
- Prolite users: Up to 120 minutes per session, with available credits.
- Pro users: No time limit.
If you exceed the allowed duration, you'll be prompted to upgrade your plan.
Can i use it to record online meetings?
Yes, you can. Just start a recording in NoteX and place your device near the meeting audio source (e.g., your laptop speaker or headset output). The app will capture the audio and process it into notes afterward.
I'm not able to upload my audio?
⚠️ Please check your internet connection and ensure the file format is supported (e.g., .m4a, .mp3,…). If you're in a country with upload restrictions, try switching to Wi-Fi or retrying via the "Unsynced" folder in settings.
What Study Materials Can NoteX Generate?
NoteX allows you to generate a wide variety of learning and content materials from audio recordings, files, links, or images — all with the power of AI. Below is a comprehensive list:
Built-in Tabs in the App
| Material Type | Description |
|---|---|
| 📝 Summary | Generates concise, structured summaries of your input content. |
| 📃 Transcript | Converts audio into full text transcripts. |
| ❓ Quiz | Creates multiple-choice or short answer questions to review key concepts. |
| 🧠 Flashcard | Generates flashcards with Q&A format (great for memorization or vocab). |
| 🖼 Slideshow | Turns your content into slide decks for presentations. |
| 🎧 Podcast | Produces auto-narrated versions of your notes for passive listening. |
| 🎬 Short Video | Generates short educational videos from your notes or transcripts. |
Additional Material Types via AI Chat
With AI Chat, you can create even more formats using simple prompts. Examples include:
| Format Type | Example Prompt & Use Case |
|---|---|
| 📝 Blog Post | "Turn this transcript into a blog post with three sections and a conclusion." |
| 📩 Recap Email | "Write a professional recap email after this meeting." |
| 📈 Project Update | "Generate a project update in markdown format." |
| 💼 LinkedIn Post | "Create a LinkedIn post sharing knowledge from this recording." |
| 🐦 Twitter Thread | "Create a thread of 5 tweets summarizing this session." |
| 📰 Newsletter | "Turn this content into a newsletter with clear sections and a CTA." |
| ✅ Action Items | "List all action items with assignees and deadlines." |
| 🧭 Learning Path | "Based on this topic, suggest a beginner's learning path." |
| 🧪 Case Study | "Write a real-world case study applying these insights." |
| 🗺 Mindmap Outline | "Create a mindmap-style outline of the key points." |
| 🎯 Key Takeaways List | "List 5 key takeaways from this content." |